Ever moved into a sparkling new home, eager to hang a few family photos, maybe a new TV, only to wonder—can you actually drill into those flawless, smooth walls? It’s not as straightforward as it sounds. New build walls aren’t the same as those in a decades-old house. They hide all sorts of surprises, both good and bad, behind their fresh paint and perfect lines. I’ve heard new homeowners say they’re scared of what’s behind that plasterboard—wires, pipes, insulation, even structural supports. The big question: can you safely drill into a new build wall, or will you end up with a disaster that ruins your home warranty?
What’s Really Behind New Build Walls?
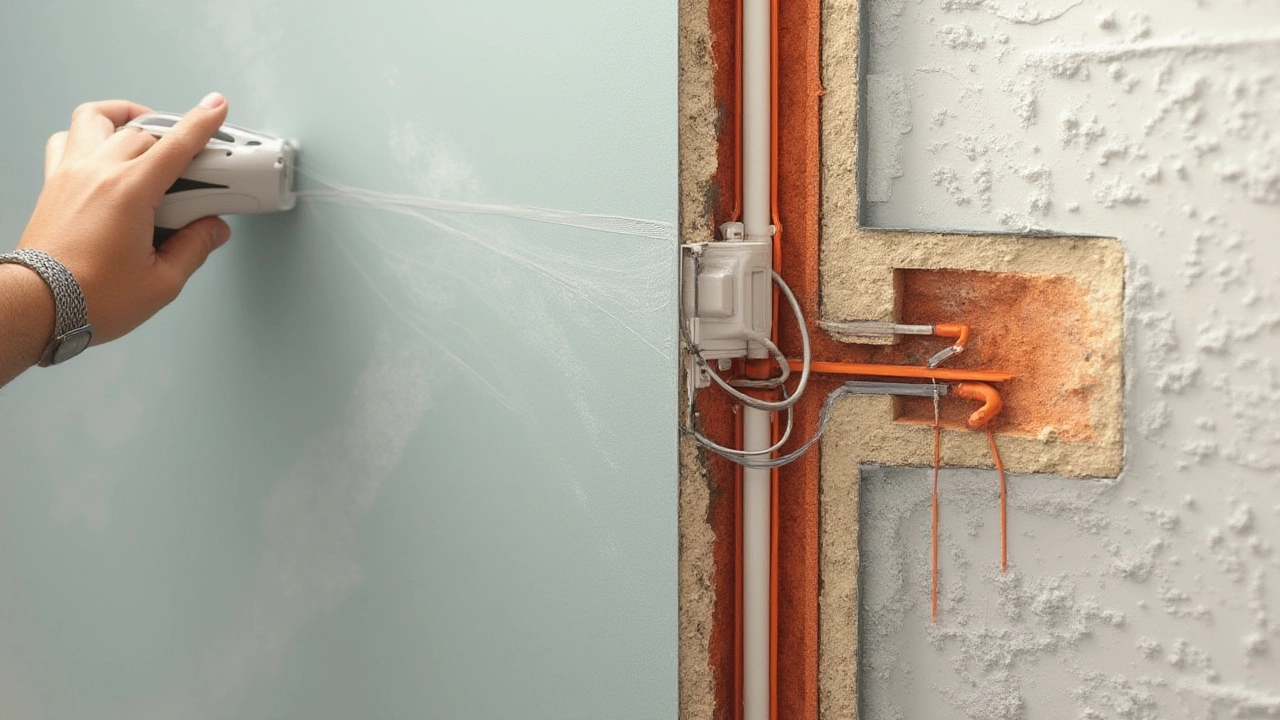
Every developer has their own way of constructing new homes, but the basics stay pretty similar. Most new build walls, especially interior ones, are made with drywall or plasterboard set on timber or metal studs. These materials make it easier, faster, and cheaper to put up walls. On one hand, that’s great—you can drill through drywall much quicker than old brick. The catch: these walls are sometimes hollow, and what’s hiding inside might surprise you. Electrical cables, water pipes, gas lines, insulation, fire barriers—sometimes even pipes for smart home tech—they’re all squeezed in behind those surfaces. A 2024 survey by the UK Home Builders Federation found nearly 65% of homeowners didn’t know what wall type they had. Surprising, right?
Take plasterboard. You might think it’s strong enough to hold a heavy picture or a bathroom cabinet, but most plasterboard can’t take much weight. If you’re dealing with external walls, there’s a high chance they’re built with concrete blocks or even structural insulated panels (SIPs) for energy savings. These are tougher to drill into and sometimes require purpose-made anchors or specific drill bits. On the flip side, timber frame construction—a popular, eco-friendly choice across the US and UK—brings up another issue: hitting a stud can be a blessing if you’re hanging something heavy, but you don’t want to hit a concealed pipe or cable that often runs right along those studs!
What about fire regulations? Thanks to increasingly strict building codes, fire-resistant plasterboard is used in many new builds. It’s denser than regular stuff, making drilling a little harder. And then there’s insulation—sometimes rigid foam, sometimes loose-fill—wedged between those stud frames. Drill through, and you might damage your insulation’s airtightness or integrity, leading to unexpected cold spots or even damp patches next winter.
So, before you go wild with the cordless drill, grab a cheap stud finder or cable detector. These little tools can save you from a world of hurt (or at least a repair bill). In a survey last year, half the call-outs for professional repairs in new builds involved damage to hidden cables and water lines. It really pays to check.
Drilling Safely: Gear and Tips for New Build Walls
Here’s the deal: drilling into new build walls isn’t a test of bravery, but a game of preparation and patience. First up—know exactly what tool you’ll need. For plasterboard and drywall, a normal cordless drill with a sharp wood bit does the trick. No hammer-action or masonry bits required (unless you’re tackling a tougher external wall). Stir clear of a sledgehammer approach—precision matters here. Want to hang a mirror, bookshelf, or even your TV? Your fixings are just as important as your tools.
Metal toggle bolts, spring toggles, and plasterboard anchors work well if you hit just the hollow board. For heavier items, always hunt for a stud—that's the timber or metal support running vertically behind your wall. A stud finder’s a must-have gadget for every new build homeowner. They’re affordable (think $15-30) and use magnets or sensors to sniff out studs, pipes, and those sneaky hidden wires. Give yourself peace of mind: always run the detector across the wall slowly and mark out what’s behind before you go anywhere near with the drill.
Next, think about wall thickness. New builds aren’t always made the same way, even in the same neighborhood. Some interior walls can be as thin as half an inch—meaning there's not much margin for error before you burst out the other side. The average modern interior wall in the US between 2020-2025 is 12.5mm-15mm thick, based on data from the National Association of Home Builders. That’s thinner than an iPad. External walls step it up a notch, usually 100mm concrete block (solid), cavity with insulation, then a board finish.
If you’re unsure, drill a tiny pilot hole. See what comes out: powdery white dust? Probably plasterboard. Hard grey chunks? You’ve hit concrete block or brick. The trick is not to rush. And before drilling anywhere near electrical sockets, light switches, or radiators, ask yourself: are there likely to be wires or pipes running vertically or horizontally from these points? It’s a smart wager, since regulations usually require services to run straight up or sideways—not diagonally.
Here’s a list of basic steps if you want to get it right every time:
- Use a stud/cable finder to map out the area.
- Consider what you’re hanging—use suitable fixings (metal anchors for light loads, heavy-duty for anything over 10kg).
- Drill a small pilot hole first, checking for resistance or unexpected material.
- If drilling into concrete, grab a masonry drill bit.
- Check your home warranty or manual—some new builds restrict wall modifications in the first year to protect against damage claims.
- Don’t drill above, below, or straight to the side of power outlets and light switches.
- Wear safety glasses, go slow, and don’t force the drill.
Ready for a hot tip? Take a look at your new build’s O&M (Operation & Maintenance) manual. Most reputable developers hand them over at completion. They’ll usually have diagrams of wall build-ups, cable runs, even pipes. Sometimes, you’ll get lucky with detailed plans marking out exactly where you can and can’t drill. And if you’re still not sure, just knock gently on the wall – a hollow sound means you’re drilling plasterboard, while a solid thud signals block or brick.

Warranty, Regulations, and When to Call a Pro
This is where things get real. Drill a hole in the wrong spot, and you’re not just risking a repair bill—you might void your brand-new home warranty. Most new builds in places like the UK and Australia come with a ten-year structural warranty, usually provided by the developer. The first two years are the “defects liability” window, where the builder has to fix problems at no cost. Drill into a wall and burst a pipe or sever a wire, and you might end up footing the bill yourself—even lose your warranty on affected parts of the house.
How strict are builders about this? Pretty strict. A 2023 study found that over 80% of warranty rejections in new builds arise from “unauthorized homeowner modifications.” That means all those extra plug sockets, new shelves, kitchen backsplashes, and (yep) holes drilled to hang a vintage clock fall into the homeowner’s lap. So, before starting, give your builder or warranty provider a call and ask what you’re allowed to do. Some contracts even allow drilling if you check for cables and pipes first and use professional help for larger installations.
It gets more complicated with fire-rated and soundproof walls. Big apartment buildings and semi-detached houses use fire-resistant plasterboard and insulation in shared walls. You drill through and compromise that barrier, you’re not just risking your own security but your neighbor’s as well. Fire regulations in the UK (since 2022) and some US states require certain repairs to be signed off by a licensed contractor to maintain compliance. Don’t take the risk—it’s not worth a catastrophe for a picture hook.
The right approach? If you want to hang something heavy—a TV, jumbo mirror, shelf—go pro, at least for the drilling. Certified installers know how to reseal fire-barriers and deal with insulated cavities. Some apartment complexes make this a rule, especially if you live above the ground floor. The average cost for a professional to hang a TV or install heavy shelving in a new build wall? Around $120 to $250 in most US metros, backed by proper receipts if you ever need to show your warranty provider.
But if you’re determined to DIY, stay safe. Double-check with your home management documentation, use maps and stud finders, and don’t skip over safety gear. It’s truly better to have a tiny, neatly finished hole than a gaping, regret-filled one. And never underestimate the power of double-sided, high-strength mounting tape for lightweight stuff—sometimes, drilling just isn’t worth it for a photo frame.
| Wall Type | Common Materials | Approx. Thickness | Tools Needed | Fixing Tips |
|---|---|---|---|---|
| Plasterboard/Drywall (Internal) | Gypsum board on studs | 12.5-15mm | Standard drill, wood bit | Use anchors or toggle bolts for weight |
| Twin Stud Partition | Plasterboard, insulation, timber studs | ~120mm | Standard drill, wood or masonry bit | Find studs, avoid pipe runs |
| Concrete Block (External) | Concrete with insulation, plasterboard | 100mm+ | Hammer drill, masonry bit | Masonry anchors |
| SIPs (Energy efficient) | OSB, foam core | 142mm+ | Wood drill, pilot hole first | Refer to plans, correct fixings |
| Fire/Soundproof Wall | Dense gypsum, multiple layers, insulation | Up to 190mm | Standard drill, drill through extra density | Often needs certified repair |
So, can you drill into new build walls? Absolutely. Just don’t go in blind. Know your wall type. Arm yourself with a good detector and the right fixings. Check your builder’s policies, respect fire and structural restrictions, and if it’s a big job—or you’re simply not sure—hire a pro. That way, you’ll be hanging your favorite art, TV, or cabinet without the fear of setting off a repair nightmare or breaking the warranty. Trust me, your walls (and your wallet) will thank you.


Write a comment