When a house starts shifting or cracks appear in walls, foundation repair is the go‑to solution for most homeowners. But the very act of fixing a troubled foundation can sometimes make things worse if the wrong method is chosen or the work is done without proper assessment. This guide walks through the most common ways foundation work can create new problems, how to spot warning signs early, and what steps protect your home from extra damage.
Quick Takeaways
- Identify the underlying cause - soil movement, water pressure, or load issues - before any repair.
- Choose the right technique (helical piers, push piers, underpinning) for the specific problem.
- Monitor cracks and settlement during and after work; sudden widening often means a repair misstep.
- Work with licensed engineers who understand local building code NZS 3100.
- Proper drainage and soil stabilization are as important as the structural fix.
Why Foundations Fail in the First Place
Understanding the root cause helps you pick the safest repair method. The most frequent culprits in Auckland and the wider New Zealand market are:
- Soil movement - expansive clays swell when wet and shrink when dry, pulling the footing out of alignment.
- Hydrostatic pressure - water buildup against the foundation wall creates outward force, leading to bowing.
- Improper load distribution - added structures or heavy equipment can overload a pier‑and‑beam system.
- Construction defects - inadequate curing of concrete or insufficient reinforcement.
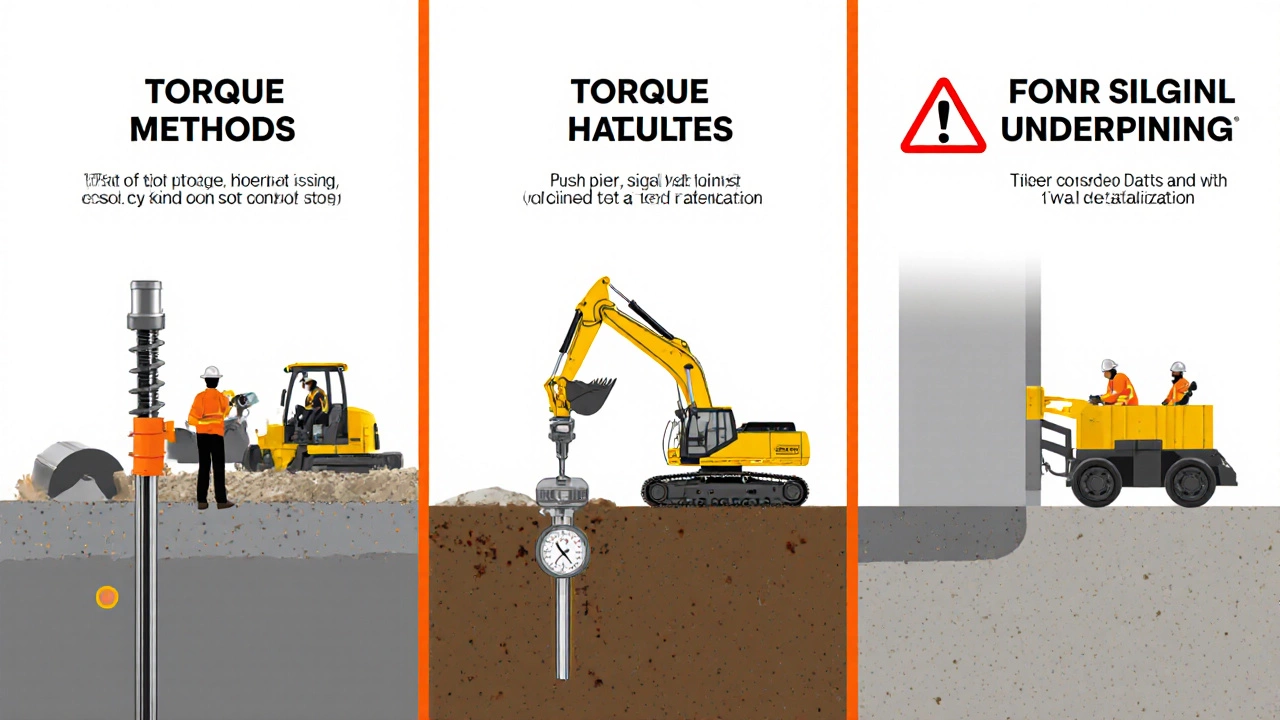
Common Repair Techniques and Their Risk Profiles
Each method addresses a specific failure mode, but they also carry distinct chances of causing secondary damage if misapplied.
| Method | Best For | Common Pitfall | How to Mitigate |
|---|---|---|---|
| Helical piers | Expansive soils, limited headroom | Over‑torquing can crack surrounding footings | Use torque‑controlled drivers; pre‑test soil bearing |
| Push piers | Coarse, granular soils with high bearing capacity | Insufficient penetration depth leads to settlement | Verify depth with a calibrated load test |
| Underpinning (mass concrete) | Deep settlements, historic buildings | Excavation can destabilize adjacent walls | d>Stage the work in 1‑meter lifts; shore walls continuously|
| Soil stabilization (lime, cement injection) | Uniform soil improvement across a slab | Uneven mixing creates weak pockets | Employ GPS‑guided drilling and real‑time pressure monitoring |
Micro‑Risk: How Repair Can Trigger New Cracks
Even when the chosen technique matches the problem, the process itself can disturb the existing equilibrium. Here are three ways that happen and what to watch for:
- Vibration shock - Driving helical or push piers generates ground vibration. In older timber‑framed houses, that vibration can loosen nailed connections, causing ceiling or floor joist cracks.
- Load redistribution - Adding piers shifts load paths. If a pier bears too much weight, neighboring footings may experience increased stress, leading to new settling.
- Moisture disruption - Excavation for underpinning often exposes fresh earth to the elements, altering water flow and increasing hydrostatic pressure on walls that were previously stable.
The key is to monitor the structure continuously. Install crack monitors or simple tell‑tale wires on major walls before work begins; compare readings daily.
Choosing the Right Professional
Not every contractor is qualified to assess these hidden risks. Look for these credentials and practices:
- Licensed structural engineer familiar with NZS 3100 (New Zealand Standards for foundations).
- Evidence of soil testing - at least three boreholes per 100 m², with grain size analysis.
- Use of torque‑controlled equipment for helical piers, and documented load‑test results for push piers.
- Clear warranty covering both repair work and any damage caused during the process.
Best Practices to Prevent Secondary Damage
Even the most experienced crew can slip up if the site isn’t prepared. Follow this checklist before the first shovel hits the ground:
- Conduct a comprehensive foundation assessment - visual inspection, level surveys, and a professional engineer’s report.
- Map existing cracks with photos and dimensions; mark each with a reference tag.
- Install temporary drainage (e.g., French drains) to control water flow during excavation.
- Choose the repair method that aligns with the documented soil type and load requirements.
- Perform a pre‑repair load test on any existing footing that will bear additional weight.
- After installation, re‑check all surrounding footings for movement; log any change above 0.5 mm.
- Schedule a post‑repair inspection after 30 days and again after 6 months to catch delayed settlement.

Real‑World Example: When a Repair Went Wrong
In 2022 a family in Whakatane hired a contractor to install helical piers after noticing a 1‑cm dip in the front yard. The contractor drove the piers too deep without monitoring torque. The excess force cracked the adjacent side‑wall footing, leading to a new 0.8‑cm settlement opposite the driveway. An engineer later had to install additional push piers and replace damaged concrete, adding $12,000 to the original $8,000 estimate. The lesson? Proper torque control and continuous monitoring are non‑negotiable.
Bottom Line: Can Repair Cause More Damage?
Yes - but only if the underlying cause isn’t correctly identified, the repair method is mismatched, or the work isn’t closely monitored. By treating foundation repair as a diagnostic and engineering exercise rather than a quick fix, you dramatically reduce the odds of creating fresh problems.
Frequently Asked Questions
How can I tell if a crack is from the original settlement or a new repair issue?
Measure the width of the crack with a crack monitor or a simple ruler. If the width increases more than 0.2 mm per week after repair, it’s likely a new issue. Also note the direction: vertical cracks often signal settlement, while horizontal or stair‑step cracks can indicate wall pressure from a repair.
Do I need a building permit for foundation repair in Auckland?
Most major repairs - especially those involving underpinning, piers, or soil stabilization - require a consent under the Resource Management Act and a permit from the Auckland Council. Your structural engineer will usually handle the paperwork.
What’s the difference between helical piers and push piers?
Helical piers are screwed into the ground like a large corkscrew, making them ideal for sandy or clay soils with limited headroom. Push piers are driven straight down by hydraulic force and work best in dense, granular soils where they can reach a stable stratum quickly.
Can DIY foundation repairs cause more damage?
DIY methods usually lack the engineering analysis and equipment needed to control load paths and soil interaction. Without proper testing, you risk over‑loading footings, creating new settlement, or violating NZS 3100, which can void insurance.
How long does a typical foundation repair take?
For most residential jobs - installing helical or push piers - the active repair phase is 1‑3 days. Including soil testing, permits, and post‑repair monitoring, the full timeline can stretch 2‑4 weeks.


Write a comment